12.28.2009

Ginger-Cranberry Relish

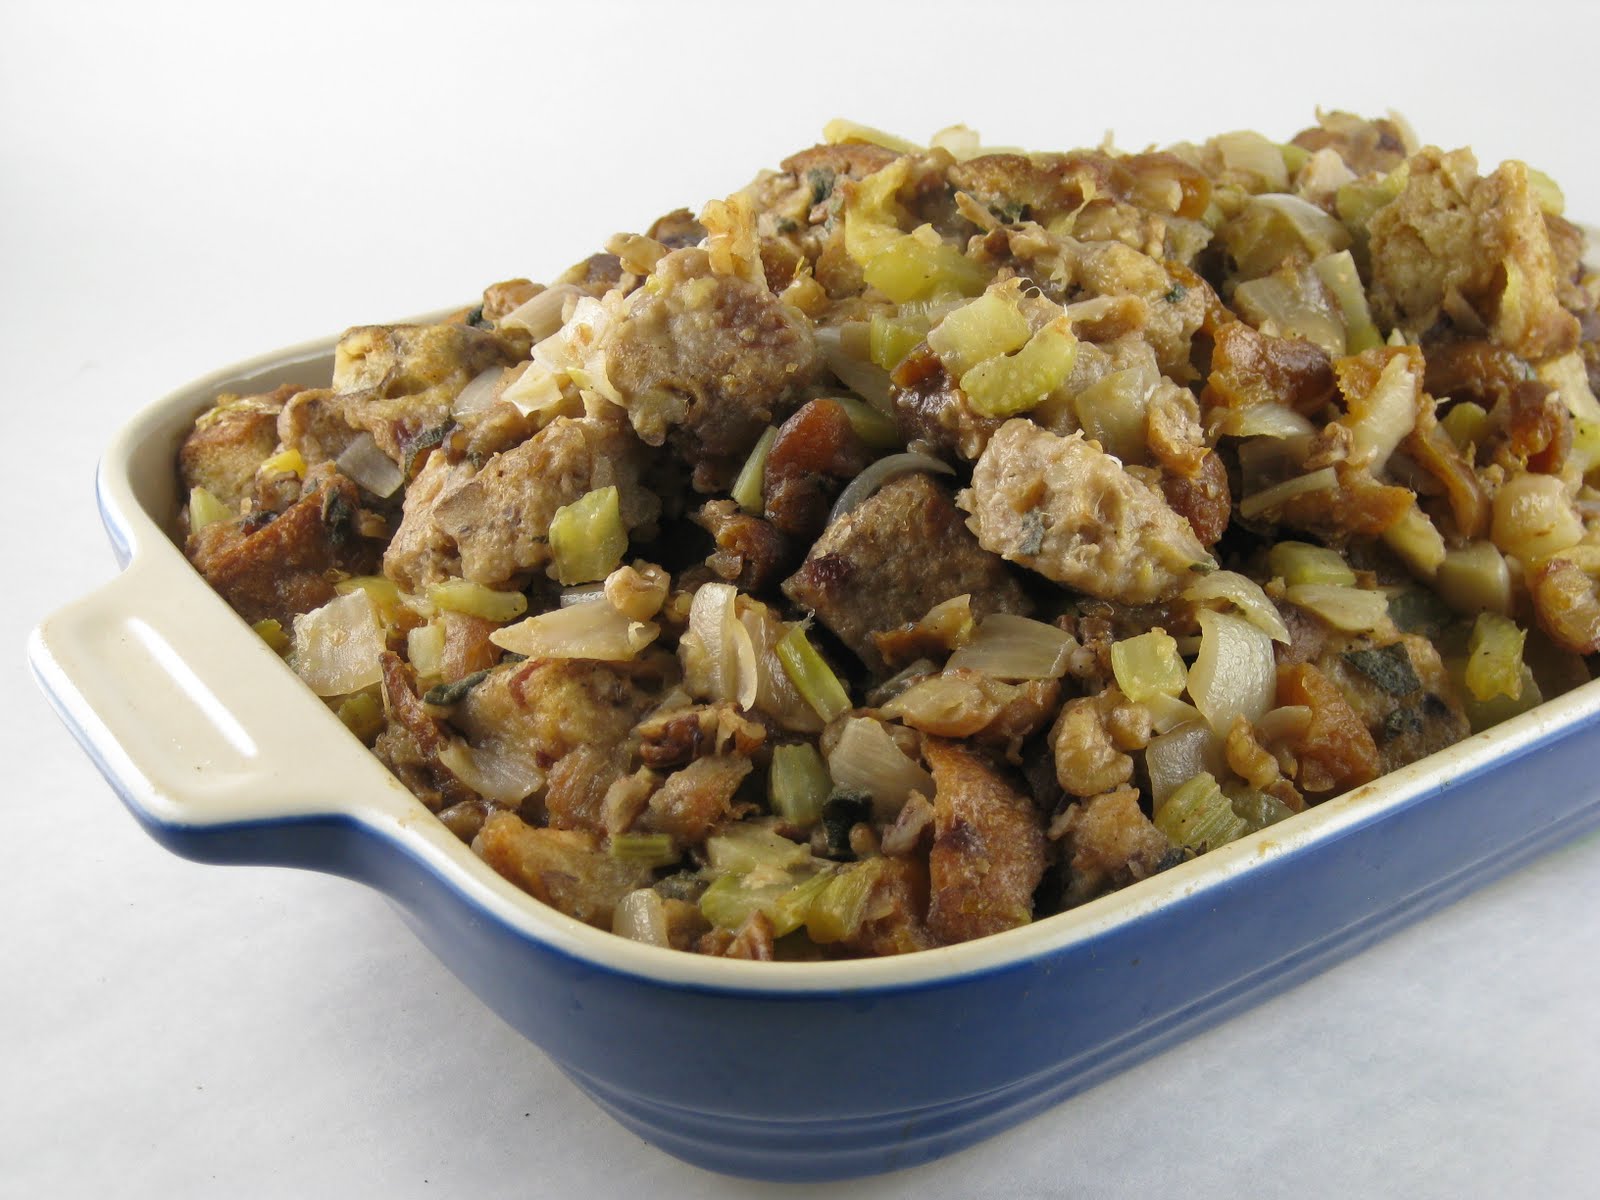
We have spent the last several days relaxing and enjoying Christmas with my wonderful Mother-in-Law, Sharon. For Christmas dinner we enjoyed an amazing roast duck that we roasted on the barbeque and last night she invited a few of her friends (of Three Sisters Laughing) over for Turkey dinner. We again roasted it on the barbeque which had an amazing way of clearing space in the kitchen so we could use the oven for the rest of the dishes.

One of the biggest hits of the evening, especially for Sharon was my Ginger-Cranberry Relish. It is seriously the easiest way to get cranberries on a Holiday table (well, arguably opening a can is probably easier, but if you prefer freshness over cans I am still right).

This relish does rely on a food processor to make it. I plan to figure out a non-food processor recipe, but in the meantime do what you can to borrow one if need be as it is worth the ease and is delicious. Or if you are potluck-ing your holiday ask a guest to throw this one together.

You can also make this several days prior and the flavors meld and merge to be even more satisfying.

So, here is the recipe for you Sharon! Thank you for hosting us in your sweet home for the Holidays and being such a great sous-chef, too!

Cranberry-Ginger Relish
12 ounces cranberries (1 standard size bag)
1 whole orange, (thin-skinned if possible, navels work well)
¾ cup sugar (or more to taste)
¼ cup crystallized ginger, chopped
1 inch piece fresh ginger, finely minced
1 teaspoon ground ginger

Rinse the cranberries and sort through removing any that are no longer appetizing looking. Cut the orange into 8 pieces, removing any seeds. Place all of the ingredients in a food processor. Pulse lightly until everything is well chopped but not to mushy. Taste and add a touch more sugar or ginger if needed.

Enjoy alongside Turkey dinners or as a spread on Turkey Sandwiches.

12.03.2009

Pomegranate-Orange Salad

Tis’ the season for this beautiful jeweled fruit!
I can’t think of a more festive fruit then the sparkly seeds of a pomegranate. Seriously, for me the Holidays are all about Red and Sparkles and what could satisfy that more than a “natural” version of Red-Sparkles.

This salad is a also a refreshing addition to the starch laden sides that grace most of our tables. Fruit, lettuce, a simple dressing and a touch a creamy goat cheese in between equal pure loveliness.

Removing the jewels can be a bit of a challenge. Simply cut in half and break into pieces. If you are like me, you will also want to cover yourself in an apron and protect anything else that make become splattered by your efforts. Some people break them apart underwater, but that will not work for this recipe as you want to reserve some of the bright red juice for the dressing.

Pomegranate-Orange Salad
4-6 servings
1 small red onion, thinly sliced
1 pomegranate, outside washed
2 oranges
1 teaspoon white wine or champagne vinegar
1/2 cup olive oil
1/2 teaspoon each of salt and pepper (more to taste)
1/2 cup pecans, broken & crumbled
4 ounces goat cheese
4 cups of spring lettuce greens

Start with the red onion, place in warm water to mellow out the astringent flavors while you prepare the rest of the salad.

Cut the pomegranate in half. Working over a colander with a bowl below (and protective clothing on your body if you are like me and spray juice all over) gently loosen the seeds from the membranes breaking the pieces a part as needed. Discard the white membranes and allow any juices to drizzle into the bowl.

Slice off each end of one of the oranges. Carefully slice down along the orange, removing all of the skin and white pitch, just the fleshy center will be exposed without any of the white pith on the outside. Next cut down through the middle of the slices (leaving the pieces long) remove any seeds lay on the flat side and thinly slice along the oranges, so you have pretty fanned-half moon pieces. Any excess juice on the cutting board can be scraped into the bowl with the pomegranate juice.

Cut the second orange in half and juice it. You will want at least a 1/2 cup of juice. Add the vinegar. Whisk in the olive oil slowly and season with salt and pepper.

Arrange the lettuce on individual plates or salad bowls or in one large bowl. Arrange the orange segments and drained red onions on top, sprinkle on the pecans and goat cheese and top with the pomegranate seeds. Drizzle a few tablespoons of the dressing on top and enjoy.

11.21.2009

Brussels Sprouts Sauté

For my 5th Birthday I choose the meal for my party, Hot Dogs & Brussels Sprouts. I remember being so excited to have the "Little Baby Cabbages" steamed and coated with one of my other favorite childhood foods- butter (who are we kidding- I still love both, but at least with butter I know how to use discretion). As my mother tells me, my young guests were less impressed (or seemingly mortified) by my selection.

But, I was blissful in my delicious selection.

Thanksgiving seems to be the one time of year that I can get my dinner guests to be fully on board with my Brussels Sprouts passion. Part of the reason being that sauteed in a bit of bacon is simply a heavenly way to pair the shredded, slightly bitter "Little Baby Cabbages".

I have yet to have a guest taste and dis this dish. Most people marvel at their new love of Brussels sprouts.

This dish is slightly salty & smokey from the Bacon balancing the bitter from the Brussels Sprouts, sweet & a touch tangy from the Cranberries and a lil' crunch from the Almonds. And it is as simple as can be to make.

If you are a vegetarian or wary of bacon, use a high-heat Almond Oil and add at least a 1/2 teaspoon of sea salt to taste. Other than sauteing the bacon the recipe follows the same. Double this recipe for a larger Thanksgiving Day crowd of 8-12 people

Brussels Sprouts Sauté

4-6 servings

1 pound Brussels Sprouts
2 strips of bacon or 2 tablespoons almond oil (high-heat preferred)
¼ cup dried cranberries
1/8 cup slivered almonds
1 teeny-tiny pinch of sea salt and ground pepper to taste OR at least ½ teaspoon sea salt and pepper- ONLY if using the almond oil instead of bacon

Trim the ends off the Brussels sprouts and cut in half through the stem-base. Lay on the flat side and thinly slice along through the stem end. Some pieces will remain together and most will become light cabbage-like threads. As if you are shredding a cabbage for coleslaw.

Next stack the strips of bacon and cut into rough pieces.

Heat a large skillet (the larger the better- to give everything enough room to get plenty of heat and color) over medium-high heat. Once hot, add in the bacon pieces. Allow the pieces to heat slightly for 1-2 minutes to sear and get a bit of crunch. Sauté the bacon, flip, turning over the strips to get color on the opposite side. Once they are just starting to turn into crunchy pieces add in the Brussels Sprout shreds and pieces. If using the almond oil, obviously skip cooking the bacon, add the oil, once hot add the Brussels sprouts.

Allow the Brussels sprouts to heat for a minute or so to gain color and sear slightly. Then begin to sauté lightly, flipping the pan if you are so inclined. Again allow the pieces to rest on the hot pan and gain color. Continue this until the Brussels sprouts are tender and slightly golden in places, about 8-10 minutes. Add in the dried cranberries and toss to incorporate. Season to taste with the sea salt and pepper. Place in an oven safe dish. It can be made a head and heated in a hot oven prior to serving. I typically stick it in the oven, covered with foil at whatever temperature everything else needs (usually the stuffing, sweet potatoes and other sides have more demanding heat requirements).

Just before serving sprinkle with the slivered almonds. And serve, piled high...

"Little Baby Cabbages"

11.17.2009

Fruit & Nut Stuffing


Some people love stuffing and some people could care less. I fall somewhere in the middle but Thanksgiving dinner is unfathomable without stuffing. That being said, my traditional-ness ends there and I love to play with the flavors stuffing can bring to the table. Last year I come up with this idea of and this year I feel it has turned into a romantic deliciousness all on its own, with the main focus being the obvious addition of dried fruits and nuts. As you will see in the recipe I make suggestions for the fruit and nut addition rather than requirements. Pecans, Hazelnuts, Walnuts and Almonds all would make great additions. Peanuts and Cashews on the other hand- not so much.
For the dried fruits, I used dried Apricots, Dates, and there were Cranberries in the bread. Golden Raisins, Figs, and Cherries would also be lovely. While I love dried Mangos, Bananas and Strawberries, they really should be reserved for trail mix- in my humble opinion. But, beyond that- play- experiment- make this your own favorite combination!

The Harvest Bread from Whole Foods is my personal favorite to use because it is already full of the Hazelnuts, Cranberries and Dates- so even the bread is full of fruits & nuts for this stuffing! But, I realize not everyone has access to this bread- I would therefore recommend a Hearty Grain French Bread as a substitute or if you are looking for something a tad sweeter and dare I say ‘naughtier’ Panettone is generally available in boxes everywhere and could add an amazingly delicious element. Make sure you don’t pick up the Chocolate variety- just the fruit and nut one. Unless you enjoy chocolate in your turkey… ugh... that's not a pleasant thought.

Remember- make this your own and enjoy!

Fruit & Nut Stuffing
1 1/2 pounds Harvest Bread, cut into cubes
2 tablespoons butter
1 tablespoon high heat vegetable oil, such as safflower or coconut oil
2 cups celery, roughly chopped small
2 cups onions, roughly chopped small
1 apple, roughly chopped (leave the peels on)
1 ½ cups dried fruit, chopped small (dates, cranberries, apricots, figs, cherries &/or golden raisins)
3-5 cups chicken or vegetable broth
1 ½ cups nuts, broken into pieces (hazelnuts, pecans, walnuts, sliced almonds)
¼ cup chopped fresh herbs (parsley, sage, rosemary, &/or thyme—sing with me now)

The bread cubes can be prepared several days ahead or at least a few hours prior to starting the stuffing. If preparing a few days ahead, spread the cubes out on a baking sheet and set out to dry for a couple days. If you are concerned about pets or family members mistaking the cubes for snacks cover them with brown paper bags or parchment paper. Some air holes will help as well. I live in Colorado which is seemingly one of the driest places ever, so if you live in a humid place I would recommend following the oven directions or if you wait until to the day of to start this project (which I so often do).

And here the oven directions are:

Preheat the oven to 300. Spread the cubes on a baking sheet in one layer. Place in the oven and reduce the temperature to the lowest setting, 180-200. Check these guys once an hour or so. The goal is to dry them out. Not dry on the outside and moist in the inside rather dried through as much as possible.

The rest of the recipe is much more simple:
Place a large sauté pan or saucepan over medium heat, actually just in between medium & medium-high heat is ideal. Add the butter and oil. Once melted and hot, add in the celery and onions, sauté, tossing frequently until they are wilted and just getting a touch of golden color. This will be about 8-12 minutes. Add in the chopped apple and saute for 3-5 more minutes.

Meanwhile, combine the dried fruit with 1-2 cups of the broth. Allow it to sit and absorb into the fruit- rehydrating them a tad bit. When the celery and onions are ready, add the fruit and broth to the pan, bring up to a simmer and simmer for 4-6 minutes.

If your saucepan is large enough you can add the cubes of bread to the pan- if not transfer to a large bowl. Toss the bread cubes with the veggies & dried fruit. Once well tossed add a few more splashes of broth until it is to your desired moistness. Toss in the nuts and fresh herbs. Combine well.

If you want to fill your bird with it- go for it. Just remember it will increase your turkey roasting time. Otherwise place it in a baking dish, cover with foil and bake alongside the turkey for the final 30-45 minutes.

I was a bit wordy in the directions- if you want to keep it simple, this recipe is actually easy-peesy, here you go:

1. Dry out the bread cubes
2. Sauté the onions, celery & apples, until tender
3. Soak the dried fruit in some of the chicken broth
4. Combine cooked stuff with bread cubes
5. Add more broth until moist enough.
6. Add in the nuts & herbs
7. Bake in the turkey or next to the turkey in casserole dish covered in foil

Happy Turkey Day!!!

11.15.2009

Harvest Rice Salad

I have been making this dish for several years and to my clients and friends in San Luis Obispo, yes this is the dish from the Thanksgiving Special back in 2005.

This salad is earthy and pretty- perfect for Thanksgiving or Holiday parties, especially if you have any Gluten-Free or Vegan guests this year. Although please note, most Vegans would not eat the honey, so just substitute agave nectar. You could even stuff this in a baked squash.

I want to give a shout out of thanks to my friend Kelly who made this dish for the photo shoot! A few months ago she moved in to a great new house with a kitchen in desperate need of a remodel-- as in they could not use the oven or stove for months because of electrical scariness. They have become very savvy on their BBQ and a little electric two burner and hosted many a great meal for us. I roasted the butternut squash for this dish otherwise she did the rest and that is her pretty bowl as well. Thank you Kelly- can't wait to cook with you in your new kitchen!

Harvest Rice Salad
1 1/2 cups brown and wild rice mixture
1 pound butternut squash, peeled and diced
2 tablespoons olive oil
1 small red onion, diced
2 green onions, sliced
3 celery ribs, diced
1/2 cup dried cranberries
1 cup pecans
1 bunch fresh parsley, chopped fine

Dressing:
1/2 cup olive oil
1/3 cup apple cider vinegar
2 tablespoons honey or agave nectar
1/2 teaspoon salt
1 teaspoon sage, rubbed
1/2 teaspoon black pepper

Preheat oven to 350 degrees.

Cook rice in 3 cups of water until it is absorbed, about 45 minutes. Transfer to bowl, fluff and let cool.

Meanwhile, toss diced butternut squash with oil and place on a greased baking sheet.
Roast until soft and browned, about 30-40 minutes. Add to rice.

Add all the vegetables, the cranberries and the nuts to the rice. Toss.

Whisk the oil, vinegar, honey/agave nectar, salt and sage and pepper until well blended, pour over the salad and toss.

11.05.2009

Butternut Squash & Goat Cheese Dip

Tis' the season for gatherings, parties, fat, sugar, glutinous eating and more. This lovely dip is an alternative healthier than most options that will give reprieve to the appetizers and party food that we come to regret in January. It is also rich in flavor with the Seasonal Butternut Squash taking on the majority of the creaminess.

Butternut Squash-Goat Cheese Dip

1-2 lb butternut squash, cut in half, scrap out the seeds
1 head of garlic
2 tablespoons olive oil
½ teaspoon sea salt
2 tablespoons fresh rosemary, finely minced
½ cup orange juice
4-8 ounces goat cheese
1 package whole wheat crackers, melba toasts, or slices of pumpernickel bread or a gluten-free rice cracker… or something that will accompany whatever way you want to dip, spread or love up your dip

Preheat oven to 375. Place the butternut squash skin side down on a baking sheet. Keep the head of garlic whole and slice off the top of the garlic to expose just the tops and place in between the two squash halves on the baking sheet. Drizzle the olive oil on the squash and garlic. Sprinkle with the salt and half of the rosemary. Roast in the oven for 35-45 minutes until the squash is soft and almost mushy.

Squeeze out the garlic cloves, scrap out the squash from the skin place in a large bowl or food processor. Mash the squash, garlic, orange juice, and remaining rosemary. Mix in the goat cheese depending on the amount of squash to taste. Add salt to taste.

Garnish with fresh rosemary sprigs. Serve with crackers or slices of toast.

10.30.2009

Curried Pumpkin Soup

In the spirit of Halloween tomorrow I wanted to share with you a simple pumpkin soup that so often graces my table as my door bell rings incessantly on Trick-or-Treat night.

It is warm, cozy, simple and delicious. This can be made with full fat half & half making it luxurious and extravagant or we very often mix in coconut milk instead. Whether you use coconut milk or half & half the pumpkins in this soup will give you a vitamin boost including beta-carotene & Vitamin A as well as calcium, potassium, and a bit of Vitamins C & K. Great way to balance out some of the sugar overload that starts tomorrow and doesn't seem to stop until January.

Use canned pumpkin or cook up your own. Preheat your oven to 375. Cut a pumpkin in half and scoop out the seeds (and then roast them up for Pepitas). Place flesh side of the squash up and bake for 30-45 minutes until a butter knife can gently cut into the flesh.

I grew that little cutie that accompanies the soup- can't wait to cook it up into something delicious. Maybe for tomorrow nights Trick or Treat!

Curried Pumpkin Soup

1 lg onion
2 tablespoons butter or coconut oil
1 16oz can pumpkin or 2 cups cooked pumpkin
4 C chicken broth or non-chic vegetarian broth
1 bay leaf
1/2 t sugar
1/2 t curry powder
1/8 t nutmeg
2 C half and half or coconut milk
salt to taste
pepper to taste
chives and/or pumpkin seeds for topping

Sauté onions until golden brown. Add the pumpkin through the nutmeg and simmer uncovered 15minutes, stirring occasionally. Puree in food processor or blender. Returns to pan add half and half or coconut milk, salt and pepper. Simmer for 5-10 minutes. Top with chopped chives and/or a sprinkle of toasted pumpkin seeds.

10.21.2009

Apple & Blue Cheese Salad with Maple Dressing

I have to apologize. It has been a silly amount of time since I last posted a blog. Just silly.

There are things going on that I am not quite ready to broadcast, but there is one I want to give a sneak peak of which is my latest & greatest project www.lillys-table.com. Please check out the splash page and sign up to be the first to be notified when we are live.

Another change is I invested in some new photography lights. To celebrate I invited over a few darling friends who showed up potluck style with many of my own recipes. We had a photo shoot with all of the model dishes and then we had a great feast!

I just had to share one of these photos and unlike my others it has not been touched up with Photo Shop, so please let me know what you think. We are happy to go back to touching up, but we weren't sure what we would change this time- so here it is in a post!

So, about the dish.... I am completely obsessed with Apples currently as they are so gloriously in season. Fennel while not quite as popular is also having its moment right now and the licorice flavor is subtle yet makes its own statement in this salad. If you prefer stronger flavors you could even try thinly sliced red onions. Paired with an Autumn inspired Maple Dressing, Pecans or Walnuts (your choice) and a sprinkle of blue cheese or even goat cheese- It is a quick & easy seasonal treat. Have it as a side or a main vegetarian salad.

Apple and Blue Cheese Salad with Maple Dressing
½ cup walnuts or pecans
Maple Dressing:
¼ cup orange juice
1 teaspoon Dijon mustard
2 tablespoons maple syrup
1 tablespoon apple cider vinegar
¼ cup olive oil
2 small or 1 large apple, fuji, gala, or jonagold
1 lemon, cut in half, optional to keep the apples from browning
4 ounce blue cheese or goat cheese
1 small fennel, trimmed and thinly slice
4 cups baby spinach

Preheat oven to 400. Toast the walnuts or pecans on a roasting pan for 4-6 minutes until just slightly golden.

Whisk together the orange juice, Dijon mustard, maple syrup, and apple cider vinegar. Whisk in the olive oil slowly into the dressing.

Cut the apples in half and remove the seeds and stems. Thinly slice the apples. If desired, rub the lemon on the slices to prevent them from browning. Thinly slice the blue cheese or crumble it.

Arrange the spinach on individual plates or a large bowl. Toss on the fennel slices, apple slices, walnuts and blue cheese. Drizzle the maple syrup on top.


Please enjoy and I promise to post with a little less ridiculous lack of frequency ;)

8.30.2009

Beet Ravioli with Tofu Spinach Filling

Making pasta from scratch was one of the first large cooking endeavors I took on as a kid. Hours later the kitchen and myself would be covered in flour as dinner was finally served. The efforts were well worth it as the egg-y smooth texture of homemade pasta is often an ethereal experience.

Today I am a touch faster, but I give myself plenty of time to enjoy the process.
Pasta Makers really, really make life a lot easier, especially for homemade raviolis. I say this entirely from experience. For fettuccine and other egg pasta used in dishes such as Chicken Noodle Soup, I am fine using a rolling pin, but in the case of ravioli I draw the line. It once took three of us my roommate, her boyfriend and myself hours of determination to roll out dough as thinly as possible only to end up with what was thick, difficult to eat ravioli not exactly what we were looking for, especially since our upper-bodies were sore from rolling.

This time, I had a Pasta Maker and a few tablespoons of Beet Powder for fun color. If you don’t have beet powder, it is entirely optional, but I love the dark pink color of this pasta.

The filling is Vegan, because my visiting niece is dairy-free and her friend is a Vegetarian so we settled on this Vegan filling since rarely do they enjoy the Ricotta-Herb filled versions. The dough however is not Vegan- so sorry.

I am sure a few of you are thinking this pasta making stuff is crazy, but the filling is perfect... well, I have an alternative solution if you are looking for a faster and not-requiring-a-pasta-maker version try: Wonton wrappers! They are usually cut into the appropriate square shape and with a few dabs of water the wontons easily come together as ravioli. They won’t be bright pink, but at least they have the tasty dairy-free center!

What are your favorite ravioli fillings?


Beet Ravioli with Greens, Pine Nut, and Tofu Filling

3 cups flour
2 tablespoons Beet Powder
4 eggs, beaten
2 tablespoons olive oil
1-3 tablespoons water

In a food processor, blend together the flour and beet powder. Slowly add one egg at a time, blending to incorporate, drizzle in the olive oil to form a ball. If it doesn’t start coming together slowly add the water a few splashes at a time until the dough is a big roll-able ball.
Let the dough rest to relax for about 30 minutes. Wrap up in plastic and set in the fridge until ready to use.

Meanwhile, make the filling:

Greens & Tofu Filling
2 tablespoon olive oil
1 cloves garlic, minced
1 bunch of spinach or other dark leafy greens, finely chopped
10 ounces tofu, crumbled
2 tablespoons nutritional yeast, optional
5-8 leaves of basil
salt and pepper to taste

Heat olive oil in a skillet over medium heat. Add the garlic into the olive oil, toss in the chopped greens and wilt slightly. Add in the crumbled tofu, sprinkle in the nutritional yeast, basil, salt and pepper. Toss and then cool slightly.

Tomato Sauce
1 tablespoon olive oil
2 cloves garlic, finely chopped/minced
24 ounce can crushed roasted tomatoes
½ cup chopped basil
1 pinch red chili pepper flakes, optional

Place a large saucepan over medium heat. Add in a drizzle of olive oil and the garlic. As soon as you can smell the garlic starting to heat and sizzle add in the tomatoes. Bring up to a simmer, stirring occasionally for 10-15 minutes until the sauce is to your desired consistency or flavor. Toss in the basil. If you like a smoother sauce, puree in a blender after you add the basil and then return to the pan to simmer slightly.

Put it all together:

Cut the pasta dough into at least 4 balls. Roll out the pasta dough thinly, using a pasta maker is ideal, but with some serious work a rolling pin can do the job.

Roll out two thin sheets and lay them next to each other. Dollop on 1 tablespoons of filling every 2 inches a part. When the sheet is full of dollops dab a little water around each pile of filling. Lay the second sheet of pasta dough on top. Lightly press the sheets together, pressing around the filling to ensure it is secure without air bubbles. With a pizza or pastry cutter, slice through creating even square raviolis. Set aside on a drying rack and continue making raviolis until you run out of pasta or filling.

Once all of the pastas are made and arranged on drying racks, bring a large pot of water to a boil. Add in a few generous pinches of salt once it is up to a rapid boil. Toss in a few of the raviolis being sure to not over crowd the pan. They will float to the top when they are ready. Scoop off a few, sauce up with the warm tomato sauce and serve.

Make sure the ravioli have plenty of room to dance and cook in the boiling water. When they float to the top, scoop them off:


Have extra rolled out thin dough? We ran out of filling before we ran out of dough, so we just sliced them into noodle-sized pieces and boiled them after we boiled the ravioli. A little extra fresh pasta treat!

8.04.2009

Sun Dried Tomato Caesar Salad

I feel I can reasonably mess around with Caesar to create my own version (you know such as removing the raw egg that makes so many nervous) but for me the quintessential flavor of Caesar Salad comes from Anchovies. I hear a few of you gagging at the thought, but bear with me and try it. I serve this regularly to anchovy haters (albeit fish eaters) and they have become believers. If you cannot get past the *idea* of eating flavor-packed fish paste in your salad dressing, try a splash of Worcestershire Sauce instead-- but be warned this also often contains anchovies. While you are reading the back of the label on the Worcestershire watch out for the now often included High-Fructose Corn Syrup. I find generic brands are sometimes 'safer'. If you have to avoid the anchovies altogether (Hi there Vegetarians!) Annie's makes a lovely Worcestershire without anchovies or HFCS.

This particular version of Caesar salad is inspired by a large jar of Costco sun-dried tomatoes marinating in olive oil and a Gluten-Free friend coming over. Toasted pine nuts replace the crunch provided by the usual croutons. Sun-dried tomatoes add just enough flavor to make this salad memorable.

Sun-Dried Tomato Caesar Salad

For the dressing:
1 clove garlic, crushed/minced
1 lemon juiced (about ¼ cup)
1 tsp Dijon mustard
1 tbls anchovy paste (or 1 tbls Worcestershire sauce)
¼ cup plain yogurt
¼ cup olive oil
¼ cup grated parmesan cheese

For the salad:
4 cups romaine lettuce, torn into pieces
1/2 cup sun-dried tomato pieces (marinated in olive oil)
1/2 cup toasted pine nuts*

Meanwhile, whisk together the garlic and lemon for the salad dressing. Allow to sit for about 2 minutes as the acid from the lemon mellows out the garlic. Add in the Dijon mustard, anchovy paste and yogurt. Whisk until combined. Taste to see if you need more of any flavors. Slowly emulsify in the olive oil: while whisking rapidly, pour the olive oil in to the dressing in a thin, steady stream. Continue whisking until all of the olive oil has been added. Taste again. Fold in the parmesan cheese.

Drizzle some of the dressing on to the romaine lettuce. Toss lightly to coat. Add more dressing as needed. Toss in about half of the sun-dried tomatoes and pine-nuts. Garnish with the remaining sun-dried tomatoes and pine nuts.

*To toast pine nuts, gently shake raw pine nuts in a skillet over medium heat. Allow to sit for 1-2 minutes. Shake. Repeat until evenly golden. Keep your nose involved. If you smell burning remove the pine nuts from the skillet as soon as possible.

7.24.2009

Grilled Salmon with Herb-Yogurt Sauce & Warm Bacon-Beet Salad

Sometimes dinner comes together through the sum of the parts in the fridge and it ends up becoming this classic dish that you want to make again and again. As it turned out I had some leftover Turkey Bacon in the fridge, a beet in desperate need of attention, handful of spinach and salmon that I had just picked up.

I did not grow up eating Warm Bacon Salads, but when I discovered people did this to salad I was shocked and jealous. Bacon on salad? Fantastic. I have since make them from time to time, but the combination with beets was quite lovely.

Turkey bacon enhanced the sliced beets and the combo wilted the spinach. With a simple Grilled piece of Salmon an extra side seemed an order. Polenta comes together with ease and grace, needing just enough attention to require your occasional stir, but not so much you are trapped at the stove.

Of course the Grilled Salmon needed to compete with the Beet Salad without being overshadowed. So I mashed together some fresh herbs with lemon and whisked in plain yogurt. Drizzled on top of the salmon and viola! Weeknight dinner using up our fridge in all the best ways.

I started with the polenta, next the herb-cream sauce for the salmon, then the bacon-beet mess and as soon as I was able to let them beets steam, the salmon hit the grill.

Polenta
I soak my polenta in milk prior as it gives it an extra boost of creaminess.

½ cup Medium-Grind Cornmeal (aka Polenta or Grits)
3/4 cup milk (anywhere from non-fat to half & half, depending on your preference)
2 cups chicken broth

Place the cornmeal in a small pourable bowl, cover with the milk and allow to soak for at least 15 minutes.

After the soaking, heat the chicken broth until just simmering. Reduce the heat to medium-low and stir in the polenta with the milk, whisking rapidly until incorporated. Allow to come up to a simmer again. Reduce the heat if the polenta begins to sputter and spit at you (it is super itchy burning hot when it hits your skin- not pleasant). A low simmer is good for about 10-15 minutes until the polenta is to your desired thickness.

Warm Beet, Spring Onion & Turkey Bacon Salad

2 slices Turkey bacon
1 teaspoon olive oil
1 small beet, trimmed and peeled with a vegetable peeler
1 spring onion or leek, sliced thin
3 cups baby spinach
½ lemon
1 tablespoon Lemon Olive Oil (or 1 tablespoon extra-virgin olive oil with 1 teaspoon lemon zest-combined)

Heat a skillet over medium-high heat. Add in the turkey bacon and a slight splash of olive oil. Cook about 3-5 minutes on each side until it is your desired crispiness (I like my Turkey Bacon crispy as I find it to be dry & chewy otherwise- not a big fan of burnt though, so watch it!)

While your bacon is cooking, cut the beet into four chunks and then slice thinly- the thinner the slice the faster they will cook.

Remove the bacon once cooked through, add the remaining olive oil and sauté the sliced beets about 3-5 minutes tossing fairly consistently so there is an even flavor (aka fat) on each beet. Sprinkle with a slight pinch of salt, add in about ¼ cup of water and cover with a lid to steam slightly. Add more water, lid & steam until the beets are your desired tenderness. Once almost ready, toss in the spring onion slices and toss 2-3 minutes. Slice the turkey bacon thinly into pieces and toss in to the beets, tossing until just warmed and incorporated. Squeeze lemon juice all over it.

If enjoying separate from the Salmon & Polenta, arrange the Spinach Greens on each plate and toss the beets onto the greens until they wilt slightly. Drizzle the lemon olive oil on each plate, especially taking care for any spinach leaves untouched by the beets.

Basil-Mint Yogurt Sauce

1/4 cup basil (or about 6-10 leaves)
¼ cup mint (about 6-10 leaves)
1 teaspoon lemon juice
½ teaspoon coarse kosher or sea salt
1 teaspoon olive oil
2 tablespoons thick Greek yogurt

Rinse the basil & mint leaves and air dry. Tear into smaller pieces than place in a mortar with the lemon juice and salt mash them up with the pestle until shredded apart. Slowly drizzle in the olive oil as you mash it.

Alternatively, mince up the herbs and stir in a bowl with the salt and lemon juice, pressing the herbs against the side of the bowl to release the herbs flavors.

Once the herbs are minced or mashed into a lemon-salty-olive oil-y mess, stir in the Greek yogurt.

Simple Grilled Salmon
2 5-6 ounce pieces Salmon
1 tablespoon olive oil
½ teaspoon salt and pepper, seasoned to taste

Rub the salmon with the olive oil or rub the grill with the oil where you will place the salmon. Season the salmon with salt and pepper to taste. Heat the grill to just below high heat. Place the Salmon flesh side against the grill. Grill for 2-3 minutes, loosen from the grill and rotate 90 degrees. Grill for another 2-3 minutes and then flip over sear skin side down for 2-6 minutes until the salmon is barely firm to the touch and slightly flaky.

To assemble the meal:
Place the polenta on one half of the plate. Arrange the spinach leaves on the other half, drizzle on the warm beets allowing the spinach to wilt and sigh slightly. Place the salmon in between and plop on the herb-yogurt sauce.

7.03.2009

Grilled Italian Kebab Buffet

I love the idea of make your own ________ parties. We have had guests over for personalized pizzas, nachos, calzones, and more. I was dreaming about “make your own Kebabs” for months- before the snow had even melted making this party worthwhile enough to stand outside to put these lovelies together.

Finally we were able to arrange a medley of veggies cut into chunks on top of our blue checker tablecloth. Then I selected three different kinds of chicken sausage: Roasted Pepper & Garlic, Artichoke & Olive, and Spinach & Feta that I cut into large pieces. Any sausage could be used, but be sure that it is at least partially cooked or smoked, so you are able to cut it into chunks. Otherwise, it will just ooze out and you will be unable to thread it onto the skewers. Next I introduced huge chunks of polenta that I tossed in a bit of olive oil. We actually tried chunks of Ciabotta bread splashed in olive oil and they turned into sad, charred croutons. The Polenta is well worth it and delicious- make sure the chunks are at least 2 inches big.

And if you haven’t tried them Grilled- Radishes are amazing. Slightly charred outside with a center that turns from slightly spicy to intensely sweet- please try them!

After cutting everything up into chunks I let our guests do the work and then we grilled them just a few feet from the table. We waited for our Kebabs while munching on Salad and a simple Goat Cheese appetizer (blog posts soon!)

Be creative with your Kebab toppings. Please share any of your favorite variations in the comments section.

Grilled Italian Kebab Buffet
1 eggplant
1 red onion
1 red bell pepper
1 yellow bell pepper
1 yellow squash
1 zucchini
8 ounces mushrooms
1 pint cherry or grape tomatoes
1 bunch radishes
2-3 pounds Smoked or Partially cooked Chicken/Turkey/Pork Sausage
1 tube of polenta (yes- I cheated a bit, check out the amateur gourmet’s step by step instructions to make it from the cornmeal)
2 tablespoons olive oil (more or less)
Kebab Sticks- if wooden soak them at least 15-30 minutes just prior to threading

Wash and trim each vegetable. Cut the eggplants into chunks and sprinkle with salt and allow to sit for at least 15 minutes while you prepare the remaining vegetables. Cut the red onions and bell peppers into 1-2 inch chunks. Cut the yellow squash and zucchini into 1 inch rounds or 1 ½ inch half moons. Scrub the radishes and trim off the greens close to the base. No worries about the little tail root as it burns off quickly. After finishing the vegetables, rinse the eggplant and allow it to dry, shaking off the excess.

Slice the sausages into 4-5 pieces, about 1-2 inches. Cut the polenta tube into half long ways. Lay down flat and cut across into 2 inch half moon pieces. Toss with the olive oil lightly. If making the polenta from scratch, allow it to set in a narrow pan, such as a bread loaf pan. After it is chilled, cut into 2 inch+ pieces.

Arrange each item into a bowl or serving tray. Please keep the sausages separate.

Next, allow your crowd to mix and match and thread their own. Keep the kebab sticks in water on the table and allow people to scoop them out and get creative. If everyone starts or ends with a different vegetable they will be easier to keep them straight on the grill.

Grill for about 5-8 minutes on each side, rotating until the sausage is cooked through.

Now you may run into this same problem we did... we managed to make and eat too many kebabs. With the leftovers we threw the smaller pieces on to a kebab- see the red onions, pepper, and cherry tomatoes in the picture below on the stick. The larger pieces we just tossed on and hoped they wouldn't slip through.

Homemade Tortilla Chips

Recently we were lucky enough to have my totally fabulous & beautiful 14 year old niece come visit for several days with her equally fabulous friend before they headed to Sing a Mile High Children's Choral Festival where they wowed us with their beautiful voices.

While they visited we did lots of cooking and they were both great sous chefs incredibly helpful and motivated. One of the first things we tackled were Homemade Tortilla Chips. This may seem overly ambitious, but hear me out, here are a few of our reasons for making these:

• Simple to make, Baked not Fried
• Cheaper than buying a bag of chips and the quality is much higher
• You can control the salt, oil, and seasonings = healthier
• You can make just enough- so you don’t end up devouring a bag in one sitting or a half finished bag that becomes overly salty crumbs or worse- stale! (we live in super-dry Colorado)
• They take less than 15 minutes to prepare a batch for 2-4 people
• The taste is much better than pre-made- fresher & made just to your taste buds!

I gave the girls a few quick guidelines and they were off and running… they made tons and we had the most amazing nachos that night. We each had our own glass pan and filled them with our own personal toppings. Which was great because my niece & husband can’t eat cheese, my niece’s friend is a Vegetarian and I personally wanted all the toppings.

The next day we took the leftovers and made Taco Salad- stay tuned for a blog post on that. I ran to the store for a few ingredients and came back to the girls cranking out a few more trays of tortilla chips.

The Recipe is almost more of a guideline as the experience can quickly become your own.

Preheat the oven to 350.

Start with a bag of corn tortillas- at least 5 per person.

In a shallow dish drizzle in 2-3 tablespoons of vegetable oil we use Coconut or Safflower Oil. FYI- I have tried olive oil and it was a bit too heavy.

Stack up the tortillas and cut into 6 wedges.

Dip one side of one tortilla wedge into the oil, press it into the next tortilla chip. Then dip the next side into the oil. Basically, blotting the excess oil onto the next tortilla wedge.

Keep this going until you have a slightly oil-y stack of wedges pressed together. Spread these out on a baking sheet.

Combine your choice of the following:
1-2 tablespoons smoky paprika
1-2 tablespoons cumin
1-2 teaspoons salt
1-2 teaspoons sugar (oh yes- highly recommend this!)
1-2 teaspoons chili pepper or chipotle powder
The zest of one lime

Just plain old salt (of course I would recommend a nice sea salt) works, too!

Lightly sprinkle your seasons of choice onto the chips. If you sprinkle from a distance well above the tray rubbing it between your pinched fingers it will lightly dust the chips without clumping.

Place the trays in the oven. This may be the only ‘tricky’ part. I have tried several different trays over the many times I have made these. Thicker trays mean the chips bake slower than on thinner trays. This is probably obvious, but it does make my recommendations for the actual baking times a bit of a challenge.

That being said; bake at 350 for about 5-9 minutes. Check them. Once they are just starting to crisp, flip them over and continue baking checking every 2-4 minutes- this is important as they can go from white to burnt in about 2 minutes. Trust me. I have thrown away many a delicious chip as I tested the theory that they will be fine without my attention.

Now- find your dips or your tortilla chip recipes and go crazy.

They can be made ahead and still served warm, here is how:
If you ‘under bake’ them, you can spread them on a baking sheet and blast them at 350 for 3-5 minutes just before serving.
Served hot they are even more amazing. To serve them hot, place a cloth napkin/towel in a basket. Fill with the hot chips and fold the cloth on top. This will keep the heat in a bit longer.

I am sure they do not last as long as store bought varieties. I can’t tell you how long, because we usually have eaten them all within 2 days. If you are actually capable of storing them seal them up and store cool.

6.15.2009

Chicken Pasta Primavera

There is this lovely time of the year, when summer vegetables start to make casual appearances, winter vegetables are still hanging out and spring vegetables boastfully grace us with their presence. I love this in between everything time as the produce options change almost daily. It is true spring, committed to several vegetables as a merging transition of the seasons.

I created this Primavera by abandoning the heavy cream sauces that occasionally are chosen for a light broth based sauce instead that merges the flavors together while allowing each to stand on their own. The vegetables could be easily changed depending on your garden or veggie drawer.

The chicken has a light crispiness from a brown rice flour coating and the finishing touch are toasted pine nuts. Enjoy and please share any variations you may try. This is a Gluten-Free option, but wheat flour and pasta can be subbed in if they are more readily available in your pantry.

Chicken Primavera over Brown Rice Pasta
1 tabelspoon olive oil
1 yellow onion
½ orange (or your favorite color) bell pepper
1 small zucchini, cut into thick pieces
8 spears asparagus, trim the ends &
1 teaspoon Herbs de Provence
½ bunch Purple Kale
¾ lb chicken thighs (about 3 thighs) or 2 small breasts cut into cubes
½ cup brown rice flour
2 cups chicken broth, room temperature to warm
1 cup brown rice pasta or whole wheat pasta
2 tablespoons toasted pine nuts

Place a large skillet or saucepan over medium-high heat. Drizzle in a splash of the oil. Once it is hot, toss in the yellow onions. Sauté for 3-4 minutes until slightly golden and add in the orange peppers. Sauté for 3-4 more minutes, add in the zucchini and asparagus and continue to sauté for 3-4 more minutes. Once the veggies are mostly done, lower the heat.

Meanwhile, set aside 2 tablespoons of brown rice flour and place the rest on a plate with a sprinkle of salt and pepper. Toss and lightly coat each chicken piece in the flour, shaking off the excess. Heat a separate sauté pan over medium-high heat. Once just hot, drizzle in another splash of the olive oil. Toss in the chicken pieces. Sear the pieces on one side for 3-5 minutes until golden on the outside, flip over and cook 3-5 more minutes until cooked through in the center. Add the chicken into the veggie pan and drizzle the remaining oil into the chicken saucepan. Once the oil is hot, sprinkle in the remaining brown rice flour to create a roux. Whisk/stir the flour and oil for about 2-3 minutes to cook out the flour flavor. Next, slowly pour in the chicken broth, whisking to incorporate until the sauce is thick and smooth. Add the kale to the veggies, toss lightly and then toss the chicken, veggies and sauce together.

Serve on top of the hot pasta, sprinkle with the pine nuts.


Below is a Creamy Variation from the blog Foodista worth checking out...

Pasta Primavera on Foodista

5.22.2009

Chocolate Granola

I was an odd American kid as I really never enjoyed cereal. Fortunately, my Mom was also not a fan of cereal and she loved making granola from scratch while I was growing up- lucky me!
Now that I am a big kid, I find cereal still does not satisfy me, but it is one of my husbands favorites- ugh. The perfect compromise- we both adore Homemade Granola!

The only challenge of granola is it needs a little baby-sitting while it is drying out in the oven. Combining the ingredients is about as simple as pouring milk over cereal, tossing, then bake and baby-sit-- stirring every 20-30 minutes.

The variations are where the fun comes in. A handful of chocolate chips and cocoa powder makes this type one of my favorites. And really who would turn down chocolate for breakfast! It is antioxidant fun in a bowl. Placing the chocolate chips in towards the end means they will melt and clump the oats, but not overcook and burn.

¼ cup honey or maple syrup
1/2 cup oil (safflower, coconut or even flax oil)
¼ cup all-natural 100% juice, apple
4 cups rolled oats, gluten-free* (not quick or instant)
1 teaspoon salt
2 tablespoons cocoa powder
1 teaspoon cinnamon
1/2 cup raisins (or dried cranberries)
1/2 cup sliced almonds (or other nuts)
1/2 cup chocolate chips

Preheat the oven to 300. Combine the wet ingredients, the honey, oil, and juice and toss on the rolled oats. Sprinkle on the salt, cocoa powder, and cinnamon. Toss well to combine and dump into a large 9x13 pan. Reduce the oven to 225. Place in the oven and toss the granola every 20-30 minutes until lightly toasted. Typically it takes about 2 hours or more. In the final 30 minutes, sprinkle on the chocolate chips. Toss lightly cool in the same pan before transferring to a storage container.

Store in an air-tight container for up to 2 weeks. It will last longer if stored in the refrigerator.

*FYI: I hear conflicting news about Rolled Oats and their Gluten Free status. Most of my GF buddies say they are gluten free, but I have noticed some oats are specifically "gluten-free". If you are nervous they would be worth seeking out, although I noticed they are a bit more expensive.

Take your Granola to-go!
When we travel or rush out the door for work we take these little cutie snack baggies with us:


Let me know about your Granola Variations...
Here are a handful of other tasty Granola Blog entries worth checking out:
Cherry-Berry Granola
Hippie Granola: Melinda's Homemade Granola

4.24.2009

Pistachio Crusted Chicken with Strawberry Salsa


Strawberry season has arrived. Finally.

Previously, I lived just north of Santa Maria on the Coast of Central California. When you drove down Highway 101 this time of year, the smells permeate and strawberry stands are all around. Typically, I would buy a large crate at a time, eat half and share half. I love combining strawberries with savory dishes and here is one of my classic dishes.

The Strawberry Salsa could technically go on top of simply prepared fish or chicken, but I love pairing it with this Pistachio Crusted Chicken. One little secret to this dish is just a touch of ground rosemary powder. It gives a pine-y earthiness that balances nicely with the sweet berry salsa. A hint o' mint & zest of lime, give not only a lovely contrasting color to the salsa but a harmony of flavor.

This is truly is a dish I cherish. We patiently wait until baskets of strawberries are everywhere and then we can finally enjoy it as often as we choose.

Start with the salsa so the flavors have a chance to meld and mingle.

Strawberry Salsa
Just toss together the following:
1 pound strawberries, clean, remove stems and chop small, into little salsa size bits
2 tablespoons finely minced red onion
1 handful fresh mint (or basil), chopped up
1 lime, zest and juice
1 splash balsamic vinegar
salt and pepper, to taste

The salsa is even better the next day, but will last up to a week if stored properly. Also, if your strawberries are not quite ripe enough add a pinch of sugar, honey, or agave until it is your desired sweetness.

Pistachio Crusted Chicken
If you do not have a blender/food processor available, chop the nuts by hand until fine.
2 servings

2 Boneless, Skinless Chicken Breast Cutlets (about 5-6 ounces each)
¾ cup pistachios, finely chopped up in a blender or food processor or mince up by hand
tiny pinch of salt (omit if nuts are salted)
½ tbls ground rosemary powder or dried rosemary, chopped fine
1 egg lightly beaten
olive oil in a spray can (optional)

Preheat the oven to 425. Prepare the chicken by pounding it to an even thickness. This can be achieved with a mallet, but if you do not have one a heavy frying pan will work. The chicken will still be fairly thick about ¾ inch or slightly more, the goal is to have it be an even thickness, not paper-thin.

Toss the pistachios on a plate with the salt and rosemary. Dip each breast into the beaten eggs and then lay on top of the nuts. Turn over and gently push the nuts into the chicken. Place the breasts on a baking sheet lined with foil/parchment paper and place in the fridge for 10-30 minutes. This will dry the nuts onto the chicken. If you don’t have time, feel free to skip this step.

Remove the chicken from the oven and gently spritz each side with the Olive Oil mister. This will give the nut-coating a bit more golden color when baked without the need to fry it. Place in the oven for 15 minutes. Turn over the chicken, spritz again if desired and continue baking for 10 minutes. Check the chicken for done-ness by pressing gently on the center of the breast. It should basically be firm but not a rock when ready. If you are still not sure, cut it in the middle to see if it has cooked through and is no longer pink in the center.

4.18.2009

Crispy Crunchy Baked Fish with Lemon Caper Sauce


Recently we were at Breckenridge Brewery and I saw some oversized, shiny fish sticks resting on a pile of crispy fries walk by. Suddenly, I remembered my Pescatarian days when I opted for Fish Sticks at places where a Vegetarian menu was a foreign term. Not exactly healthy, but typically wipe-the-grease-off-your-chin tasty.

Now, I was craving the crispy coating around the moist fluffy white fish. However, my lack of desire to have a deep fryer and the obvious amount of fat oozing around an otherwise healthy piece of fish were preventing me from ordering a plate full. So, I worked out my own crispy dish o’ fish.

This recipe is inspired by a recipe in a Cuisine at Home magazine from a couple years ago. While Panko breadcrumbs are fabulous for any breading I wanted a bit more crispiness and dare I say greasiness. A small bag of potato chips did the trick. I used the unsalted Kettle Chips so I could better control the salt. Mustard gives a bit more flavor and while I usually have a nice relish on hand for a quick tarter sauce all I could find were capers… and my Lemon-Caper Sauce was created to be the final touch!

I also have an obsession with Kale and noticed that it is a common decoration in the Seafood Department (what a waste!) so I quickly sautéed a pile of kale to balance out my crispy seafood feast.

Crisp-Crusty Fish
½ cup low-sodium potato chips, crushed into pieces
½ cup panko breadcrumbs
2 tbls grated parmesan cheese
1 tbls Italian seasonings
2 tbls mustard
2 eggs, lightly beaten
1 lb tilapia, cut into pieces that are even sizes, typically I cut through the center to create two long pieces
olive oil in a mister can

On a plate, toss together the potato chips, pankos, parmesan, and seasonings. Whisk together the mustard and beaten eggs in shallow bowl. Dip the tilapia pieces into the mustard egg mixture. Shake off the excess and place in the crumb mixture. Adhere the crumbs, pressing in slightly.

Preheat the oven to 475. Place the fish on a baking sheet lined with foil. As the oven heats up it will give the coating a few minutes to “dry” itself onto the fish. Just before placing in the oven, spray the fish with the olive oil spray. Flip over the fish pieces, spray again lightly with the olive oil. Roast for 5-8 minutes. Flip over the fish and bake for 4-6 more minutes until the fish is golden and flaky when broken. Or slightly firm when you touch it in the center.


Sauteed Kale
1 bunch Kale, washed and torn into pieces
1/2 teaspoon olive oil or a quick spray from the mister
1/2 teaspoon salt and pepper to taste

Heat a saute pan over medium-high heat. Drizzle in the olive oil and toss in the kale pieces. Quickly saute tossing the leaves until they crisp in some places and wilt in others.

Lemon Caper Sauce
1/4 cup mayonnaise or vegenaise
1/2 lemon juiced, about 1-2 tablespoons
1 heaping tablespoon capers
salt and pepper to taste

Whisk together the mayo with the lemon juice. Make it as tangy as you like it. Stir in the capers. Season with salt and pepper to taste and serve alongside the Crispy Crunchy Baked Fish.

4.10.2009

Pashka & Kulich

For my family, Easter is much better with the egg-y dense Russian Bread, Kulich, along with its best friend the creamy-sweetened spread Pashka.
Last year, I spent Easter with my brother and sister in San Francisco and asked if there were any food requests for the big day. Pashka and Kulich- hands down.

I contacted my Mom -who has not made it in years- and she sent me a Recipe from a 1974 Sunset Magazine along with our Oma’s recipe for the Pashka. In reading the Kulich recipe it instructed 45 minutes to knead. My Mother had a great response typed within the recipe she emailed me-- “Good Grief”. A Kitchen Aide Mixer seemed the only solution, but neither my bro nor sis had one. Fortunately, we found a lovely Russian bakery in San Francisco, I ordered, my brother paid and my sister picked it up- successful group effort. This year for my pre-Easter feast with friends I was determined to finally make the family classic myself.

My Oma passed away when I was just 6 years old and while I have memories of her there are just not enough of them. Several of her recipes are so classically a part of my family that it keeps us all connected to her. I blissfully spent the morning thinking of her and the many times she must have made this in her own kitchen.

In the end, using my Kitchen Aide mixer the Kulich seemed to only need about 5 minutes of kneading with the dough hook. I am a slightly nervous baker and had many anxious moments during the making of the Kulich. Give yourself at least 5 hours from the time you are planning to serve it. Mostly because of the rising time, I was a bit rushed and cut a few of the rises short. Plan to make the Pashka the night before as it drains & sets overnight.

Also, please note I am not Russian. My Oma is not Russian. Apparently, just a big fan of Russian sweets. I did not have a coffee tin to bake it in- where do you get those anymore without purchasing dried up old coffee? I bought a couple of paper Panettone Moulds , which did the trick but caused them to be “squattier” than normal as you see in the pictures. Usually they are at least 8 inches high. Next year, I will find better paper moulds.

Despite, the shortness I swear they tasted better than I remember… maybe because of the 8 egg yolks or the fact that they were fresh out of the oven. Either way, I am so happy to add this to my list of recipes and I hope you will try it out too.

Start the night before with….
My Oma' Paskha
2/3 c. butter, room temperature
2/3 c. sugar
1 egg
2/3 c. sour creaam
28 ounces Ricotta (or 2 lbs dry curd cheese as the original recipe suggests)
1/3 c. raisins –chopped (actually I forgot to chop them- no need)
Zest of 1 orange or 1 T. finely cut citrus peel
1/4 lb. finely chopped blanched almonds or slivered almonds
1 tsp. vanilla
3- 8 oz. pk. cream cheese, room temperature
Optional Decorations: Edible Flowers, Sliced Almonds, Currants, Raisins or other dried fruit

Special Equipment:
Cheesecloth, Strainer, and an Electric Mixer is helpful.

In a Mixer or large bowl, cream the butter and sugar together. Over medium heat, whisk together the sour cream and egg until well combined and just hot. Remove from heat to cool, continue to whisk until it has cooled slightly.

Add the ricotta through the soft cream cheese. Beat until well combined. Line a strainer with cheesecloth and place in a bowl. Fill with the Pashka (ours was overfilled) and drain overnight.

The next day, place a plate on top of the Pashka, flip over and peel away the cheesecloth. Decorate the Pashka with various décor, we used sliced almonds to create a flower design.

*Please note, the recipe originally had 2 egg yolks in it. My Mom suggested omitting as they are raw and don’t change the quality of the Pashka dramatically. If you are a raw egg fan or a Pashka purist, feel free to add them when you cream the butter and sugar and let me know how it goes.


Kulich
Russian Easter Bread
Slightly adapted from Sunset Magazine 1974


1/4 cup milk
1 cup butter -room temperature
3 1/2 c. flour
1 egg
1 envelope yeast
1/4 cup lukewarm water
1 cup sugar
1/2 teaspoon salt
8 egg yolks
1 vanilla bean
1 Tablespoon vodka or brandy
1/32 tsp. ground saffron or a pinch of threads
1 orange zested with a microplane or ¼ cup of candied orange peel chopped up
½ cup currants
½ cup slivered almonds

Glaze
1 c. powdered sugar
1 T. lemon juice
1 1/2 tsp. water or more lemon juice

Directions:
The initial step was a bit odd for me, but apparently worked well overall.

Combine 1/4 c. milk, 2 T. butter and bring up to boil, stirring constantly. At once dump in 1/4 c. flour. Off the stove stir vigorously until mixture is smooth and paste like. Add the egg and beat well to incorporate. Set aside to cool down and mellow out a bit.

Add the yeast to warm water and stir in 1 teaspoon sugar in a Medium size bowl. Let stand 5 minutes until the yeast has had a tasty snack and is bubbling up and ready to go. If it doesn’t bubble, start over with new yeast, warm water and sugar (yeast may have been too old, water to hot/cold, or maybe the sugar was not tasty enough for those little guys?)

Once the paste-cooked mixture is lukewarm add in the yeast mixture, stir, cover with a lid or towel and let rise for 30 min.

In a Mixer with a whisk attachment, beat remaining butter and sugar with the salt . Slowly add in each egg yolk and combine each well.

Meanwhile, split the vanilla bean and scrap seeds into a bowl, pour in the vodka and saffron. Allow to rest for a few minutes until the saffron has dissolved and released its color. Stir in the orange peel.

Add the Vodka-Vanilla-Saffron into the butter mixture.

Slowly add in the remaining flour about ½ cup at a time until fully incorporated. Add in the yeast mixture. Exchange the whisk attachment for the dough hook and turn it on to about medium-high speed until the dough begins to pull away from the bowl. At this point, toss in the currants and almonds and incorporate.

If not using a mixer, follow the original directions and knead 45 minutes. To quote my Mom—“Good grief.”

Place in a warm place, loosely covered with a moist towel and allow to raise for 2 ½ hours.** Once raised, knead slightly and divide into two.

Place each in the paper molds or in 2 coffee cans lined with parchment and well buttered.
Raise in a warm place for 1 ½ hours.**

Preheat oven to 325. Place in oven and bake for 15 minutes. Lower temperature to 300 and bake for 45 more minutes. Cool in the papers or remove from the cans and cool.

Make the glaze by whisking together the powdered sugar, lemon juice and water. Drizzle on top of the breads, using a fork to make thin streaks on top. Often you will see Kulich adorned with flowers or other such décor.

**Please note, I was anticipating my lovely golden dough was going to double in size. It did not and it still turned out great. Please do not panic as I did because it tasted delicious regardless of not raising outside of the oven and doubled once it was in the oven. Go figure!

4.09.2009

Chocolate Covered Oreos

Easter memories are some of my happiest. More often than not I would be wearing a dress made by my Grandmother with a white matching hat and we would dash around with a basket clanking filled with pretty hard-boiled eggs. Eventually we would find the basket- one for each of us- filled with precious treats, tasty goodies and chocolate tucked in the paper grass. For me Dark Chocolate of some shape or coating is an Easter day requirement and as an adult the one processed food I still maintain a weakness for are Oreos.

Although, I am often more partially to Newmans or Joes O’s or some other *faux* brand where I can feel a touch less guilty, but in this case we had the naught ones- the originals. Of course, since a plain old Oreo dipped in milk is perfectly delish why not dress it up and call it your own, by dipping them in chocolate instead (milk is perfectly legit and recommended after the chocolate has dried on). Next time, I plain to add a touch of coconut oil as I feel they will have less of a melt-in-your-finger-texture since coconut oil stays fairly solid at room temperature. Let me know if you try it with coconut oil.

These days I may not be into wearing an Easter bonnet, but I refuse to say good-bye to any Easter item dipped in Dark Bittersweet Chocolate.

1 cup chocolate chips or your favorite dark chocolate chopped
12 Oreos

Set a metal bowl on top of a small-medium sized saucepan 2/3rds full of water. Bring water up to a boil.
Once the bowl is hot, add in the chocolate chips. Slowly stir and fold the chips against the hot bowl.
Once the chocolate has melted, drop in one Oreo at a time. With two forks, gently flip them over until they are fully coated.

Place them on wax paper and allow to cool.

At this point, dip in milk or just eat as many as your tummy can handle in wild abandonment!

4.07.2009

Cocoa Mint Roasted Lamb with Orange Roasted Asparagus


Lamb is my favorite Easter dish. It represents so much of spring and I adore serving it with Mint Sauce. I originally created this Cocoa Mint Rub when I found a small rack of Lamb in our freezer that we had managed to ignore for over a year. I knew they would need a strong rub in case the freezer had an effect on the flavor. While the main taste is Cocoa there is a bit of coffee in there to intensify the overall experience. We were all instantly hooked to the richness of the Cocoa with the lightness of the Mint against the tender lamb. This rub is now my favorite accompaniment to Lamb… and something about putting Chocolate and Mint on the main dish rather than in the Easter basket just charms me.

Of course, this Easter Lamb needs buddies and asparagus grabbed my attention- especially since it has been a long winter with out those sprigs of goodness. I prefer them roasted with an almost caramelized essence and orange seemed a great way to tie together the Cocoa, Mint and Lamb. And to officially bring them altogether I made an Orange Mint-Basil Sauce, which would be incredible drizzled on roasted vegetables, chicken or even as salad dressing.

Cocoa Mint Roasted Lamb

Cocoa Mint Rub
2 tbls raw sugar
1 tsp kosher salt
¼ cup mint, washed, dried, torn into pieces
1 clove garlic minced fine
¼ cup cocoa powder
1 tbls ground coffee

3-4 lb Lamb Shoulder or Leg, Boneless

Preheat oven to 450. Combine the Rub ingredients and pound with a mortar and pestle. Alternatively, it could be blended in a mini-food processor or blender.

Lay the lamb on a cutting board. If the butcher wrapped it in strings to hold it together, leave the strings on. Sprinkle and press the rub onto the lamb until it is well coated with the rub. Place a wire rack inside of a roasting pan. When I don’t have a wire rack handy I will place long sticks of celery along the bottom of a baking dish. This allows the meat to be slightly elevated and circulate the heat.

No need for a lid or any moisture. Roast the lamb for 20 minutes at 450.
Reduce heat to 325. Stick a thermometer into the center. When the thermometer reaches 135 the lamb will be rare after resting and when it reaches 145 it will be medium after resting.

Remove the lamb, cover with foil or a lid and allow to rest for 15-20 minutes. Cut off the strings if necessary. Slice the meat about ¼-1/2 inch thick.

Serve with the Orange Mint-Basil Sauce and Orange-Roasted Asparagus

Orange Roasted Asparagus

1 lb asparagus
1 tbls olive oil
½ tsp kosher or sea salt
1 small orange

Preheat the oven to 425. Gently break off the tough ends of the asparagus by bending it about 2-3 inches from the bottom until it snaps. Toss the asparagus with the olive oil and a pinch of the salt.

Slice the Orange into ¼ inch thick slices. Remove seeds if necessary. Toss onto the asparagus. Sprinkle with a pinch of salt.

Roast for 8-12 minutes until the asparagus is tender and slightly golden.

Orange Mint-Basil Sauce
Greatly influenced by http://www.epicurious.com/recipes/food/views/Basil-Mint-and-Orange-Vinaigrette-12081

½ cup mint, washed and dried
½ cup basil, washed and dried
1 orange, zest and juice
2-4 tablespoons of orange juice (depending on the juice in the orange)
1 clove garlic
1 tsp orange vinegar or white-wine vinegar
1 pinch of salt and pepper
½ cup olive oil

Place everything except the oil in a blender and blend until smooth. Slowly drizzle in the olive oil until emulsified.